Thursday, December 3, 2009

Topsy Turvey Whimsical Cupcake

This cake was amazing to do.  Lots of work because I used 3 cakes per tier and then carved them to give them a tapered look.  The bottom tier is composed of an 8", 9", and 10" pan and the top tier is a 6". 7" and 8" tier.  Frosted with buttercream and then covered by MMF.  The cherry and letter were made of MMF and Gumpaste. It was fun to do and I just finished making it.  Now I'm working on a 4 tier wedding cake. The client saw a similar one online, but totally different the only resemblance to the one in the picture was the cherry on top and the fact that they are supposed to be whimsical cupcakes.


Saturday, November 28, 2009

Tips on Baking the perfect butter cookie

Have you tried baking sugar or even butter cookies at home and they seem not to bake right?  They are too dark or burnt, or when you bite into them they are dry and hard? Well, I'm giving you a tip that may help you bake them just right every time.  Your cookie should look beautiful not only on the side you decorate, but on the other side too.


Make sure that before you use your cookie cutters, you roll out your dough as even as possible.  The reason for this is for the cookie to bake evenly.  Thinner sides will bake faster and thicker sides will take longer making your finished baked cookie look burnt and yucky!


As you cut them place them on a parchment paper lined cookie sheet and leave enough space between cookies so that they have room to expand and not stick to each other.


Once your cookie is taken out of the oven it should look golden brown and even like the picture above.  If it's darker than this and it's not a gingerbread cookie than you have over baked your cookies and I can guarantee that they will not taste good at all.

Hope this mini tutorial helps you make some great cookies during these holidays! 


Fall or Thanksgiving cookies

These are Vanilla Bean cookies.  They are covered in Vanilla Bean  flavored Royal icing.  I'm really happy on how smooth they came out.  I finally figured out the right consistency. These cookies flew!


Acorns, Leaves and Pears


Pears (I love how these came out)


Leaf

Thanksgiving Dessert Dominican Cakes

These cakes I made are not artistic in their nature because the client wanted something simple, merely to be enjoyed for their taste, but delicious they were!  Dominican cake with plum and cream filling covered with Suspiro (Dominican Frosting) or boiled meringue.  I had to make one for me as well!
 
This was for a customer 10x10 round


I made an 8x8 for the family

Damask - Black and Green Tablescape

This year I wanted to do something  different for Thanksgiving.  I didn't want to use the traditional colors and icons used for this celebration. So I decided to use Damask and Sage green.


I made these little favors that also served as place cards for everyone sitting at our table. Inside are two Ferrero Rondnoir chocolates. These are simple mini lunch sacks that I cut a piece of Damask scrapbooking paper and glued on and added a punched tag with a ribbon. With a black pen I wrote our guests' names.


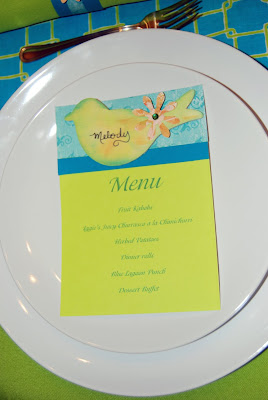
Menu card tucked into a pocket folded black napkin decorated with damask ribbon I found dirt cheap at Micheal's. I made the menus with Photoshop using a Damask stamp. Trimmed it with a similar green cardstock and used Chopin font.

 
Dinner tables for 12 people. I had beautiful yellow roses pn a black vase and smaller vases for the centerpieces and pears to bring in some warmth and whimsy to the black and sage green colors used. As a runner I used some damask material.


Closer view


The desserts consisted of Dominican cake, apple pie, pumpkin pie, coconut flan, Vanilla bean cookies, and delicious fruit turron.

Sunday, November 8, 2009

Pop Art Cupcakes

I was asked to come up with cupcakes that showcased words of inspiration in English and in Spanish.  I've always been a fan of pop art so I figured I would do these kind of with that concept in mind.  The flavors are Red Velvet with cream cheese frosting topped and vanilla with vanilla buttercream all topped with MMF.


Wednesday, November 4, 2009

Little Yellow Corvette Cake

I made this cake yesterday. It's a 10" round with a MMF molded corvette on top.  The client ordered it for her husband to celebrate  their 34th anniversary.  She explained to me that this has always been his favorite car.  Flavor Leelee's Specialty Vanilla Cake.
\


Pink Daisy Cake

Ok, so this is not really a fun cake, but I had to do it for a client that really only wanted to do was have a taste of  Leelee's Vanilla Specialty cake to see if she likes it to then order a more elaborate cake.  I've made this cake before in another color. I hope she likes it.

Thursday, October 29, 2009

Witch Cake

This is a pretty big cake and I enjoyed every part of decorating it! The flavor is Vanilla/Hazelnut, with nutella filling in the middle.  Frosted first in yummy vanilla buttercream and topped with MMF.  The Moon I did with two semi-circle pans that I put together with nutella filling and frosted and covered with MMF just like the bottom cake The only difference is that the Moon is made out of a pound cake recipe so that it would hold it's shape.   My favorite part of making this cake was making the witch and her side-kick black cat, these are also MMF. I LOVED how they came out!  This cake feeds from 50 to 60 people. This is my interpretation of Debbie Brown's cake.

Witch around the Moon


Closer look and my molded witch, so darn cute!


Screaming Cat holding on to broom!

Halloween Cupcakes

The flavor for these cupcakes was Leelee's Vanilla specialty covered first with Vanilla Bean buttercream, and topped with vanilla flavored MMF tinted in Royal blue and sprinkled with edible white glitter.  The hats, brooms and pumpkins are all made of MMF.


Halloween Pumpkin Cookies

I love how these cookies came out.  Golden brown and perfectly even.  These are Lemon Chiffon sugar cookies decorated with lemon zest flavored MMF. To die for!!! Great now for Halloween or without the Jack-o-lantern eyes, nose and mouth, they can be great for Thanksgiving.  These cookies are huge, 3x4.

Saturday, October 24, 2009

Piston Cake - Cars Cake

The flavor of this cake is Leelee's Specialty Vanilla  with vanilla bean buttercream icing and details in MMF. I made it for a little boy turning 2.  The Piston Cup is made out of Rice Krispies Treats and MMF, (the kiddos will enjoy that sweet trophy).  The little car was molded of MMF as well. 

Dominican Pride Cake

Flavor: Dominican Cake all the way, that's all I can say.

Rice Krispies Treats Sneakers Tutorial

I've been swamped by questions on how to make the sneakers from Rice Krispies treats and since I had said that I would post tutorials and haven't, here you go:

Things you'll need:
Rice Krispies Treats (of course) You can buy these or make them yourself
Pizza cutter of a sharp knife
Paste food color (I use Wilton)
fondant tinted in the colors you are making your shoes ( I used grey, black, white and orange)
and your hands

First you determine how big you want to make the shoes and start adding RKT to get desired size. Then, you start molding it and giving it shape. Once you have the bottom shaped like you want it to look, start working on the upper part of the shoe by pulling from the RKT and adding more as needed.Your shoe should resemble a dutch shoe. If you are making a pair, make it now so that they are both the same size because once you start covering it with fondant you won't be able to have an accurate measurement.Once your shoe is shaped, roll out your fondant, (not too thin) so that it covers well. Cover the inside of the shoe first and have the fondant hang outside the shoe, then create the tongue of the shoe. Cut the front and lateral parts of the shoe and adhere them.Once your shoe is covered, all you have to do are the embellishments that will finish the look. Make six small circles for where the shoe laces go and with a pointy tool make an indentation. For the laces, just cut strips of fondant and place them carefully across the shoe and with your point tool make them look as if they were coming out or the circle by pushing them into the indentations you made. Add a white strip to make the brim and make marks on it as a sneaker would have. With a tool make indentation so that it looks line stitches.
There you have it. Your very own RKT and fondant shoes. Hope this tutorial helps you make these cute sneakers. If you do, I would love to see them.